|
|
|
|
M81 - without gas purge |
M81 - with gas purge |
What is a 'gas purge'?
The principle is very simple - a gas purge of film is the injection of a dry
gas (or even desiccated air) into the camera body to keep film dry during long
exposure astrophotography. Most usually Nitrogen is used because it is an inert
gas which is available from stock and is therefore not too expensive. Desiccated
air may also be used though possibly with slightly less advantage. Astrophotography
is a curious form of photography - it subjects film to conditions it was never
designed for. During night time (when most astrophotography needs to be done)
the cold air leads to a much higher content of water vapour than during the
day. This tends to permeate the film as moisture during long exposure astrophotos,
leading to various undesirable effects.
Why use a gas purge?
There are three main reasons for using a gas purge, and they all
stem from the fact that film can absorb large amounts of moisture during long
exposure astrophotography.
Film movement(creep, warp, or bowing). As film absorbs moisture its dimensions can change, leading to slight movement on the film plane during the exposure. This is especially true of hypersensitised film, since this process usually desiccates the film to some degree. The film then acts like a sponge to the moist night air.
Colour Shift- Moisture build up in the film can cause strong colour shifts. I regularly see an overwhelming blue cast to broadband objects that are photographed using long exposures in damp conditions. I do not understand the reason (other than it being caused by moisture) but it may be due to the moisture being more readily absorbed by some layers than others.
Sensitivity- Overall sensitivity can be substantially lowered by excessive moisture in the film. It is known that moisture plays an important part in causing reciprocity failure, and one of the objectives of film hypersensitisation is to remove moisture. If film is allowed to re-absorb moisture during the exposure it can cause severe problems as well as nullifying the effect of hypering.
Generally, moisture and film do not go well together for astrophotography. The film should be kept as dry as possible. A gas purge solves this problem.
Consider the following two photographs...
|
|
|
|
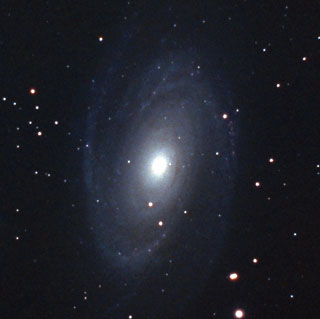
M81 - without gas purge |
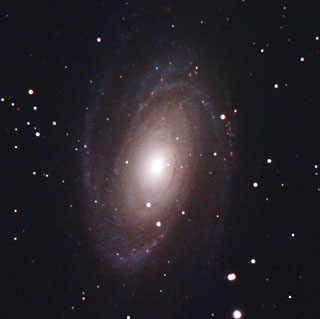
M81 - with gas purge |
There is a striking difference between these photographs. The left hand photograph
illustrates the problem that has plagued me for almost three years - an overwhelming
blue cast to the image. This is not to do with colour balance (both of these
images were adjusted correctly) - the problem seems to be that light records
overwhelmingly on the blue layer and nothing can be done to balance that out
since only a very weak image exists on the green and red layers. This is by
no means a one off example - almost all of my photographs taken over the last
three years exhibit this problem. The left hand image simply isn't correct -
M81 is not overwhelmingly blue in colour. Notice the vast improvement in the
right hand image - the inner parts record correctly in a sort of reddish brown
colour (caused by light of older red stars being diffused and reflected by dust
and gas) while the outer parts record correctly in a blue colour (caused by
the light of the young blue stars). Notice also how the red H-alpha regions
in the outer parts show up very clearly whereas they are almost invisible in
the left hand image. The right hand image is as it should be, with far greater
colour differentiation and colour fidelity.
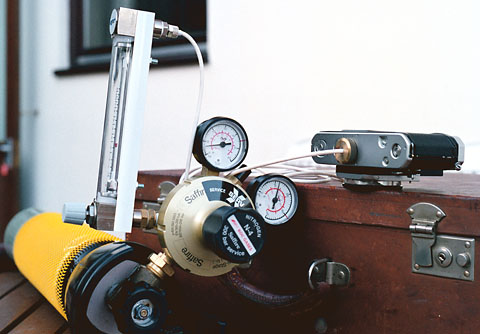
 To the
left can be seen the complete equipment used for the gas purge. The cylinder
containing Nitrogen gas can be seen at the lower left, with the two stage regulator
attached to it in the lower middle part of the picture. The flowmeter can be
seen attached to the left of the regulator. It must be used vertically so it
has a swivel nut attachment that allows it to be rotated parallel to the cylinder
for storage. I have 12 ft of neoprene tubing which can be seen attached to the
top of the flowmeter. This terminates at the gas nozzle which can be seen screwed
into the tripod socket of the Nikon F2. The Nitrogen cylinder has a capacity
of 3 litres and is pressurised to 200 bar, so that it contains 600 litres of
pressurised gas. I normally set the regulator output pressure to 0.7 bar (10psi)
and the flowmeter to 20 ml/min via the needle valve adjustment at the base.
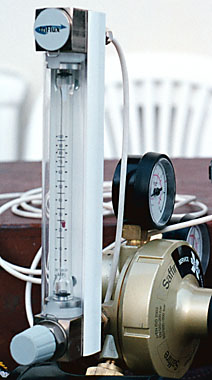
On the right can be seen a close up of the flowmeter.
To the
left can be seen the complete equipment used for the gas purge. The cylinder
containing Nitrogen gas can be seen at the lower left, with the two stage regulator
attached to it in the lower middle part of the picture. The flowmeter can be
seen attached to the left of the regulator. It must be used vertically so it
has a swivel nut attachment that allows it to be rotated parallel to the cylinder
for storage. I have 12 ft of neoprene tubing which can be seen attached to the
top of the flowmeter. This terminates at the gas nozzle which can be seen screwed
into the tripod socket of the Nikon F2. The Nitrogen cylinder has a capacity
of 3 litres and is pressurised to 200 bar, so that it contains 600 litres of
pressurised gas. I normally set the regulator output pressure to 0.7 bar (10psi)
and the flowmeter to 20 ml/min via the needle valve adjustment at the base.
On the right can be seen a close up of the flowmeter.
The Detail
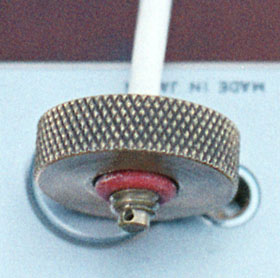
 To the
left can be seen the gas nozzle which was made for me by Chris
Heapy. It screws into the regular tripod socket of any camera and has a
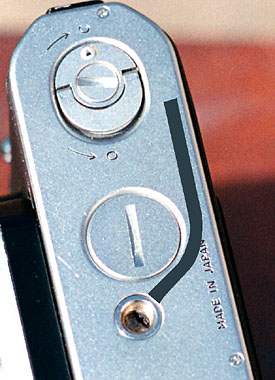
right angle in the bore to help prevent light leakage. To the right can be seen
the base of the Nikon F2. When I removed the baseplate I saw that it would be
of no use to drill vertically through the tripod socket since the gas would
merely enter the lower section of the camera and would not enter the film transport
section. Therefore I fitted a tube which connects the entry point in the tripod
socket with the film transport section. The path that this tube takes internally
is illustrated by the dark grey path which I superimposed on the photo. The
tube is of thin black plastic and in the photo it can be seen just entering
sideways into the tripod socket. It is Araldited in place and forms a tight
gas seal. The presence of this tube does not interfere in any way with the normal
function of the tripod socket. Moreover because the tube takes two complete
turns in its path it is completely light tight even with nothing fitted to the
tripod socket.
To the
left can be seen the gas nozzle which was made for me by Chris
Heapy. It screws into the regular tripod socket of any camera and has a
right angle in the bore to help prevent light leakage. To the right can be seen
the base of the Nikon F2. When I removed the baseplate I saw that it would be
of no use to drill vertically through the tripod socket since the gas would
merely enter the lower section of the camera and would not enter the film transport
section. Therefore I fitted a tube which connects the entry point in the tripod
socket with the film transport section. The path that this tube takes internally
is illustrated by the dark grey path which I superimposed on the photo. The
tube is of thin black plastic and in the photo it can be seen just entering
sideways into the tripod socket. It is Araldited in place and forms a tight
gas seal. The presence of this tube does not interfere in any way with the normal
function of the tripod socket. Moreover because the tube takes two complete
turns in its path it is completely light tight even with nothing fitted to the
tripod socket.
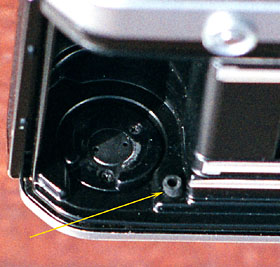
 Tothe
left the yellow arrow shows the point at which the black tube emerges into the
film transport area. Notice that it will cause Nitrogen to flow directly on
to the film, saturating both the exposed film and film canister in Nitrogen.
The tube is a tight fit, so that no light leakage can occur, and it is also
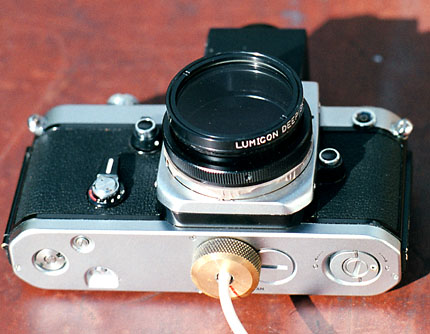
firmly Araldited in place on the underside. To the right can be seen the complete
camera fitting. The gas nozzle can be seen screwed into the tripod socket on
the base. Also very important is the dust / gas seal fitted to the lens port
of the camera. This serves two purposes. Firstly it stops undue amount of gas
escaping into the telescope and thus diluting the gas in the film transport
area. Secondly it stops dust falling onto the film. The dust / gas seal consists
of a multicoated UV filter which is fitted to a Lumicon filter holder. Here
the filter is shown fitted to the Lumicon GEG camera adapter. This same filter
also fits the 35mm camera adapter for the AP 155 EDF refractor. This dust /
gas seal is not used when the camera is fitted to the 4" field flattener
- in that case the field flattener acts as an effective gas / dust seal.
Tothe
left the yellow arrow shows the point at which the black tube emerges into the
film transport area. Notice that it will cause Nitrogen to flow directly on
to the film, saturating both the exposed film and film canister in Nitrogen.
The tube is a tight fit, so that no light leakage can occur, and it is also
firmly Araldited in place on the underside. To the right can be seen the complete
camera fitting. The gas nozzle can be seen screwed into the tripod socket on
the base. Also very important is the dust / gas seal fitted to the lens port
of the camera. This serves two purposes. Firstly it stops undue amount of gas
escaping into the telescope and thus diluting the gas in the film transport
area. Secondly it stops dust falling onto the film. The dust / gas seal consists
of a multicoated UV filter which is fitted to a Lumicon filter holder. Here
the filter is shown fitted to the Lumicon GEG camera adapter. This same filter
also fits the 35mm camera adapter for the AP 155 EDF refractor. This dust /
gas seal is not used when the camera is fitted to the 4" field flattener
- in that case the field flattener acts as an effective gas / dust seal.
I have checked the gas flow from the outlet in the film transport area and
it seems to be good. I can increase the flowmeter output to the very maximum
and there is not enough back pressure to cause any problems. The strong spurt
of gas from the outlet indicates that there are no undue restrictions. When
the flowmeter output is changed via the needle valve the response is almost
immediate, also indicating that there are no back pressure problems.
This modification was fairly 'invasive' in terms of what was done internally to the Nikon, however the end result is quite elegant since it has no effect at all on the normal operation of the camera. A tripod can be used in the normal way but even with nothing fitted to the tripod socket the camera is completely light tight. When the gas purge needs to be used the gas nozzle is simply screwed into the tripod socket.
Acknowledgement:Thanks to Chuck Vaughn who gave me virtually all the information I needed to purchase the components and implement a working gas purge system.
|
|
|
|